Posts

Creating a Show Reel + Final Degree Show Preparations

Image
With the degree show approaching, this blog post will cover final preparations and will also include my show reel.  Below is the show reel I have created to display my work. I ordered my final prints for my physical portfolio, while my paintings are made to display best digitally, I still wanted an option available for people should they prefer physical portfolios. I added in some basic title pages to separate each section, below is some images to give an idea of what the physical portfolio looks like. Ultimately it is just all the work in my online portfolio organised into a physical one. I also updated and tidied up my online portfolio both on my website and on ArtStation. I have included some screen captures below to show the additions of the recent projects. I now feel ready for the upcoming degree show, I will continue to do what I can to promote the event and my work in hopes people might come and take a look at it!

Finalising the Character Concept

Image
I finished the concept for my retro futurism inspired character. I wanted her colour palette to fit with the props I have designed already within this theme, and then I added in features I liked most from my previous concept sketches of the character. I tried to give more information on materials used so if this was given to a 3D modeller they would better understand the textures on the clothing. I also used a pose reference to sketch over on the back view to serve as a quick base to build on top of, this was much quicker that doing a body posed from scratch again.  Next, as the degree show is approaching, I will be working on making sure my online and physical portfolio are up to date. I will also need to create a show reel to promote my work, I will do a blog post going through these updates once they are complete.

Further Concept Development

Image
I worked on some sketches following on from the thumbnails I did previously, I am happy with how these sketches turned out and I think I got to explore lots of ideas. It helped me establish things I didn’t like and design elements I would want to potentially take into the final concept for this character. To speed up my process, I sketched over a reference image of a person standing posed and designed the character on top of this outline. Below is a picture of the concepts, and a timelapse of the process. Next, I went through each design to see elements I liked and things I thought didn’t really work. Effectively asking “Does it look good?” and “Does it serve a function?”, generally if the answer to either of these is yes, then I find the design element has potential and might do well in a final concept. If it doesn’t make a design look good or if it doesn’t make sense, then there’s no point in taking it further.  Elements I like I circled green, elements I didn’t like I circled re...

Thumbnail Development

Image
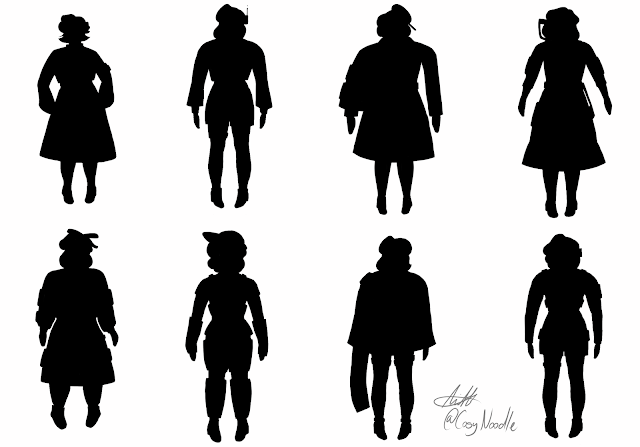
I worked on creating some thumbnails for the character I want to create, while I have created thumbnails for props I haven’t done this process for characters before, but as it is a very widely used process I wanted to try it. At first I didn’t think this would be helpful, but the constraints of only having effectively the outline/silhouette of a character to work with forced me to think of different designs to make this basic outline more interesting. The top row of thumbnails I looked at 50’s references first then added in more futuristic influences on top, I then switched the order I looked at references for the bottom half of the page, looking to futuristic influence first, then adding in 50’s inspired elements. I felt this was a good way to push me to explore lots of options and avoid sticking in one type of design. Below is the image of the thumbnails, as well as a 30 second timelapse, moving forward, I will continue to create some sketches exploring my designs further. 

Research Stage for the Next Character

Image
As with previous projects, I started off by looking through Pinterest and saving images that I found interesting or that might help me in designing my character concept.  Below are some screenshots of the kinds of images I found and saved, and a link to the board itself. https://pin.it/5X94m2iUz Starting out I wanted to get a feel for 50's fashion generally, I know I want my character to be a woman so I looked to typical styles worn and sold at the time. Then I looked at different types of hairstyles to get some insight into styles of hair worn in the 50's. Next I looked into futuristic fashion styles; cyberpunk and techwear gave me some good ideas. Similar to the prop designs, while I want to lean into the 50's aesthetic heavily. I think futuristic designs tend to put functionality first, so merging the functionality of these designs into a 50's aesthetic I feel would work well. I also had a look at 'spacesuit' style designs and body armour. I found this resear...

Learning Agreement v.4

Image
I have included my new learning agreement below, essentially I will be creating a character concept to fit into the same theme as the props I have designed.

Finishing Prop Concepts

Image
I finished doing my prop concepts for this project, I am happy with how they turned out. I tried to keep rendering to just the 'posed' versions of the props, as less detail is needed on side or back views.  I think in future I would probably include more of what I did on the bin concept by showing what material is used on different parts of the prop. I don't think I communicated this as well with my other props, so this is definitely something I will take forwards.  In order of how they are shown on this blog post, from top to bottom, I created concepts for; a toaster, a coffee machine, a bin and a light fixture. Staying again with the theme of the previous concepts, blending futuristic design with 50's design. The shapes and colours I used I tried to link in with the 50's while functionality was more futuristic. As usual, below is all of the images of the final props along with 30 second time lapses of the process for each. The microwave contains heated grill slots...

Continuing to Develop Concepts

Image
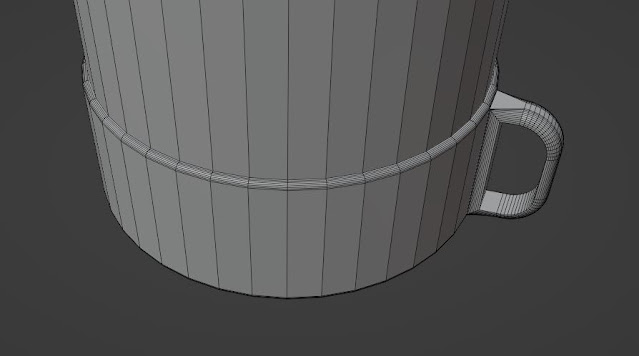
I have spent the past few days getting back to concept work, I decided to change my workflow slightly as previously I would model a prop, then outline, colour, detail and complete. I would do this for each prop concept, completing the entire process for one prop before working on the next.  The problem with the workflow is as I am not as familiar with 3D modelling as I am painting, I would find it difficult to get used to using Blender each time, so I instead set out to model a selection of the props first before taking them into the rest of the process. I felt this worked much better, and was able to get 4 props modelled in a day, ready to move on to the next steps. Below are some screenshots of the models that I created and then would take into Procreate to finalise my concepts. The props I chose to create concepts of being a bin, coffee machine, lighting fixture and toaster. I then worked on creating outlines over the models on Procreate. Now I had some clean line-work, I could ...

Preparing for the Degree Show + Looking for Jobs in Industry

Image
The past week or two I have focused on getting preparations done for both the degree show, and generally preparing for looking for work in industry. While this isn't directly related to my physical practice, I felt it was still important to update everything I have been working on here. One of my first tasks was to update my portfolio on both ArtStation and on my website, below are screenshots of the new website and the updated ArtStation. Here is a link to both of these sites for a full view: ArtStation -   https://www.artstation.com/cosynoodle Website -  https://cosynoodleart.wixsite.com/portfolio Next, I designed some business cards and ordered those in preparation, as well as a display/holder for them. Next I ordered printouts of all of my work for my online portfolio so I could have a physical version for people to flick through if preferred. I also ordered a display case/carrier to display these in (I haven't put the printouts in just yet). Below is example of one o...

Developing Some of the Final Concepts

Image
After the exploration of multiple concepts I went over in my previous posts, it was time for me to start to create finalised concepts for these props - my goal is to do as many of these as I can to improve my workflow and understanding of creating prop concepts.  Many artists in industry concepting props start out with using a 3D modelling software to create something to work from. Essentially, rather than sketching two views of a prop from scratch, it is quicker to create a 3D model so sketch over after creating it - by no means does it need to be 'game ready' as a 3D artist would do this, but it just speeds up the sketching process.  So I went into Blender and made my first prop, I have included screenshots of this below. I started out by making a clock.  Once I was happy with where everything was placed and the shapes of everything, I took these screenshots into Procreate to begin working on the final concept. Again. I have included images below, as well as a 30 second...